Iceberg Example

In my previous post I examined how to use BlobSync to create a tool that not only uploads/downloads deltas to Azure Blob Storage (and hence saving LOTS of bandwidth), but also how to keep multiple versions in the cloud easily.

As a sample file for uploading/downloading I’ve picked the entire Sherlock Holmes collection. Big enough that it can show the benefits of dealing with deltas for bandwidth savings, but small enough that it can be easily edited (text).

Firstly, I perform the original upload.

image

Here you can see that the original sherlock file about 3.6M and for the initial upload the entire file is uploaded (indicated by the “Uploaded 3868221 bytes” message).

Then I list the blobs and it shows I only have 1 version (called “sherlock” as expected).

iceberg2

Now, I edit the sherlock file and modify a few lines here and there, and reupload it.


iceberg3

We can instantly see that this time the upload only transferred 100003 bytes. Which is about 2.6% of the original file size. Which is a nice saving.

Then we list the blobs associated with “sherlock” again. This time we see 2 versions:

  • sherlock 8/01/2015 11:36:09 AM +00:00
  • sherlock.v1 8/01/2015 11:36:01 AM +00:00

Here we see sherlock and sherlock.v1.  The original sherlock blob that was uploaded was renamed to sherlock.v1. The new sherlock uploaded is now the vanilla “sherlock” blob.

Note: The timestamps still need a little work. The ones displayed are when blobs were copied/uploaded. This means that sherlock.v1 doesn’t have the original timestamp when sherlock was originally uploaded but when it was copied from sherlock to sherlock.v1. But I can live with that for the moment.

Now, say I realise that I really want to have a copy of the original sherlock. The problem is that my local version has been modified. No problems, now I can tell update my local file with the contents of sherlock.v1 (remember, thats the original one I uploaded).

iceberg4

The download was 99k (again, not the 3.6M of the full file). In my case the c:\temp\sherlock is now updated to be the same as the blob sherlock.v1 (ie the original file). How can I be sure?

Well, I happen to have a spare copy of the original sherlock file on my machine (c:\temp\sherlock-orig), and you can see from my file compare (fc.exe) that the original sherlock and my newly updated local copy are the same.

Now I can upload/download deltas AND have multiple versions available to me for future reference.

So, what happens with all my backups I don’t want? Well, you can always load up any Azure Storage Explorer program and delete the blobs you don’t want. Or you can use Icerberg to prune them for you.

Say I’ve created a few more versions of sherlock.

iceberg5

But I’ve decided that I only want to keep the latest 2 backups (ignoring the most current one). ie I want to keep sherlock, sherlock.v2 and sherlock.v3.

I can issue the prune command as such:

iceberg6

Here I tell it prune all but the latest 2 backups of the sherlock blob. I list the blobs afterwards and you can indeed see that apart from the latest (sherlock) there are only the 2 latest backups.

I’m starting to look at using this for more of my own personal backups. Hopefully this may be of use to others.

Versioned backups using BlobSync

As previously described, the BlobSync library (Github, Nuget, Blog) can be used to update Azure block blobs without having to upload the entire file/blobs. It perform an intelligent delta calculation and uploads the minimal data possible.

So, what’s next?

To show possible use cases for BlobSync, this post will outline how it is easily possible to create a backup application that not only uploads the minimal data required but also keeps a series of backups so you can always restore a previously saved blob.

The broad design of the program is as follows:

  • Allow uploading (updating) of blobs.
  • Allow downloading (updating of local files) of blobs
  • Allow multiple versions of blobs to exist and prune what we don’t want.

For this I’m using Visual Studio 2013, other versions may work fine but YMMV. The version of BlobSync I’m using is the latest available at time of writing (0.3.0) and can be installed through Nuget as per any other package (for those who are new to Nuget, please see the Nuget documentation).

Of the three requirements listed above only the last one really adds any new functionality above BlobSync. For the upload/download I really am just using a couple of equivalent methods in BlobSync. For the multiple versions we need to figure out which approach to use.

What I decided on (and has been working well) is that for updating of an existing blob, the following process is used:

  • Each blob will have a piece of metadata which has the latest version number of the blob
  • On upload the existing blob is copied to another blob with the name <original blob name>.v<latest version number>. (along with paired signature blob)
  • New delta is uploaded against existing blob.

For example, say we have a blob called “myfile”. This means we also have a “myfile.0.sig” which is the paired signature blob.

When we upload a new version of myfile the following happens:

  • copy myfile to myfile.v.1
  • copy myfile.0.sig to myfile.v.1.0.sig
  • upload delta against myfile

This means that myfile is now the latest version and myfile.v.1 is the version that previously existed. If we repeat this process then again myfile will be the latest and what used to be myfile will now be myfile.v.2 and so on. It should be noted that the copying of the blobs is performed by the brilliantly useful Azure CopyBlob API which allows Azure it copy the blob itself and doesn’t require any traffic between the application and Azure Blob Storage. This is a BIG time saver!

Now that we’d have myfile, myfile.v.1 and myfile.v.2 we should also be able to use this new project to download any version of the file. More importantly be able to just download the deltas to reduce bandwidth usage (since that is the aim of the game).

So this is the high level design in mind…   you might want to look at the implementation.

BlobSync and Sigexplorer updates!

Both BlobSync (Nuget and binary release) as well as Sigexplorer have been updated with some nice improvements.


BlobSync now has parallel uploading of the binary deltas to Azure Blob Storage. Sounds like an obvious improvement (which I’ll continue to expand/improve) but wanted to make sure all the binary delta edge cases were working before adding tasks/threads into the mix. Currently the parallel factor is only 2 (this will be soon configurable) but it’s enough to prove it works. There have been some very tough bugs to squash since the 0.2.2 release, particularly around very small adjustments (byte or two) at the end of files being updated. These were being missed out previously, this is now fixed.

A small design change is how BlobSync uses small signatures when trying to determine how to match against new content. The problem is when we should and should NOT reuse small signatures.

For example (sorry for dodgy artwork), say we have a blob with some small signatures contained in it:


uupdate2

Then we extend the blob and during the update process we need to see if we have any existing signatures that can be reused in the new area:


uupdate3

uupdate4

The problem we have is that if these small signatures are a few bytes in size and they’re trying to find matches in the new area (yellow) there is a really good chance that they’ll get a match. After all, there are only 256 values to a byte! So what we’ll end up with is a new area that is potentially reusing a lot of small signatures instead of making a new block/signature and uploading the new data. Now strictly speaking we usually want to reuse as many signatures/blocks as we can but the problem with using so many tiny blocks is that we’ll soon fragment our blobs so much that we’ll end up not being able to update properly. Don’t forget a blob can only consist of 50000 blocks maximum.

So a rule BlobSync 0.3.0 has added is that if the byte range we’re looking at (yellow above) is greater than 1000 bytes and the block/signature we’re looking at is greater than 100 bytes then we’ll attempt to match OR  if the byte range and the signature are exactly the same size. This way we’ll hopefully reduce the level of fragmentation and only add the volume of data being uploaded by a small percentage.


Sigexplorer has also been improved when you want to view the signatures being generated. Instead of rendering all signatures at once in the tree structure it will simply populate the “branches” as the user clicks on them. This reduces the load time significantly and makes the entire experience much quicker.

Exploring BlobSync in depth (aka bandwidth savings for Azure Blob Storage).

After receiving some more interest in the BlobSync project (Github and Nuget), I thought I’d go into some more depth of what the delta uploads look like and how you can really tell what BlobSync is really doing.

Firstly we’ll look at a simple example of uploading a text file, modifying it then uploading it again but this time only with the delta.

The text file I’m using is 1.4M in size, not really a situation where bandwidth savings is required but it demonstrates the point. Firstly, the original upload:


blobupload1


So for the first upload (without a previous version of the blob existing in Azure Blob Storage) the full 1.4M had to be uploaded.

Then I edited text.txt, specifically I added a few characters in the first part of the file then I remove some other characters in the lower third. The second update looks like:

blobupload2


So here we see the second time around we only needed to actually upload 3840 bytes. Definitely a good saving.

The question is, what *really* happened behind the scenes. To examine what happened we need an addition tool called SigExplorer (Github and binary) as well as downloading the signature files associated with the blobs.

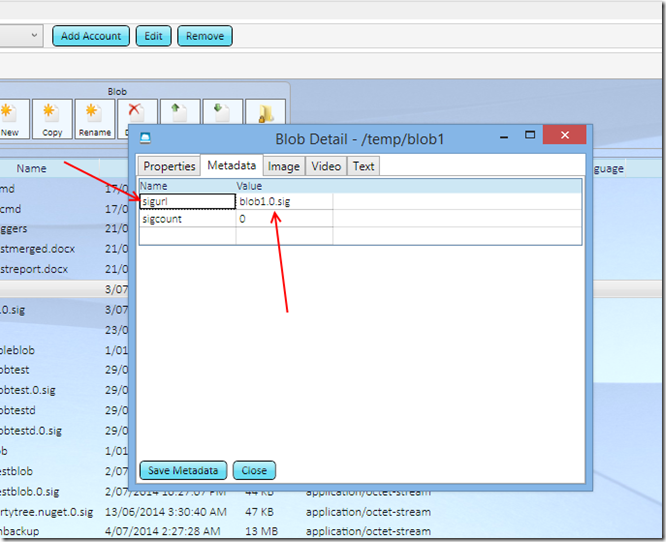
Details of what is contained in the signature files is covered in an earlier post, but a quick explanation is that a signature file contains hashes of “chunks” from our main files. If multiple signatures match then they contain the same data and therefore can be reused. To get the signature files for the above blobs I needed to upload the first blob, get the signature file, perform the second upload and then get the updated signature file. This way I have 2 versions of the signature file for comparison. To determine the signature file name is we look into the metadata of the blobs. In this case I could see it was blob1.0.sig. Any decent Azure blob tool can find it for you, in my case I like  Azure Storage Explorer:

signature


In this case I retrieved the metadata for my “blob1” blob and could see the “sigurl” metadata had the value of “blob1.0.sig”. This means the signature blob for blob1 was in the same container and with the name “blob1.0.sig”.

So I downloaded that then performed the second upload as shown above, then downloaded the new sig file. This leaves me with 2 signature files, one for the original blob and one for the new one.

Now we have the data, lets use SigExplorer to look at what’s actually happening. First load SigExplorer (sigexplorer.exe) and drag the original signature file into the left panel and the updated signature into the right one.

(in my case I’ve renamed them first-upload-blob1.0.sig and second-upload-blob1.0.sig

sigexplorer1


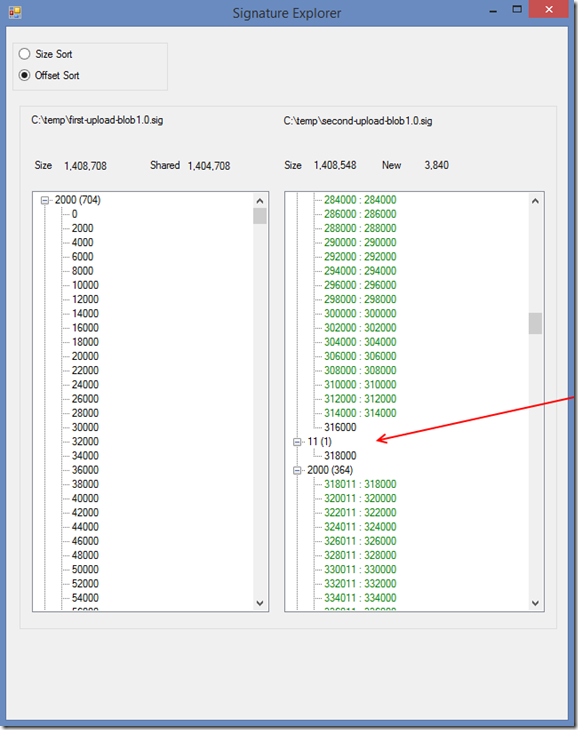
Even before we start expanding the tree structures we get a number of useful facts from the initial screen. As indicated by the red arrows we know the original blob size (1.4M) and how much of the data was shared when the second upload happened. In this case 1404708 bytes were NOT required to be re-uploaded because they were already available in Azure Blob Storage!! The final red arrow clearly tells us that only 3840 bytes were required to be uploaded. So instead of uploading the full 1.4M we only uploaded a measly  3.5k. Admittedly we already knew this because when we executed the BlobSyncCmd.exe it had told us. But hey, nice to see the signature files confirming this.

The 2 tree structures (left for original, right for updated) represent the individual blocks that comprise the blob.  In the left tree we see 2000 (704). This is telling us that starting at the beginning of the file we have 704 blocks of 2000 bytes in size. The expanded tree showing 0, 2000, 4000 etc are the individual blocks and are showing the offsets in the file that they are located. Honestly the left tree is always fairly boring, the right hand tree is where the details really are. In this case again we start with blocks of 2000 bytes but we see we only have 159 of them. Then we have a single block of 11 bytes (this represents *some* of the text that I added). Then we follow with 364 blocks of 2000 in size followed by a single block of 1829 bytes. This block previously was a 2000 byte block but I had deleted 71 bytes when modifying the file. Then we continue with more blocks which are the same as the original file.

If we expand these changed blocks we can see more details:


sigexplorer2


In the above image we can see a bunch of green nodes. This represents blocks that have been reused, ie NOT uploaded multiple times. Green is good, green is your friend. The 2 numbers indicate where a block is located in the new blob and where it used to be in the old blob. So we can see everything up to offset 314000 basically hasn’t shifted. Offset 316000 is in black and represents a 2000 byte block that needed to be uploaded. This is due to nowhere in the old blob were the exact same 2000 bytes existing in any other block. Following that we see the single block of 11 bytes. So far then we’ve had to upload 2000+11 bytes.

We can also see that we are able to reuse more blocks but now they’ve actually moved location, for example the 2000 byte block that is now located at 318011 used to exist at location 318000 (obviously due to we’ve added in that 11 byte block previously). This is the real key to why BlobSync (and similar methods) is so effective. We can find and reuse blocks even when they’ve moved anywhere else in the blob.

Now we’ll have a quick look at where I removed data:


sigexplorer3


In this case we can see we added in a single block of 1829 bytes. This used to be a 2000 byte block but as previously mentioned I removed a few bytes. This means the old 2000 byte block couldn’t be used anymore so we had to discard that and introduce a new block.


In total from the signatures we can see we’ve had to upload 2000 + 11 + 1829 bytes (which  gives us the 3840 bytes we see at the top of the screen).


Now, it’s all well and good to show a working example with text files that aren’t really large, but what about something a little more practical. Say, a SQL Server backup file? Offsite backups are always useful and it would be great not to have to upload the entire thing every time.


sigexplorer-sql


Although not huge files we can see that we’re now getting a bit more practical. In this case I backed up a database, did a couple of modifications and backed it up again. After uploading, grabbing signature files etc we can see the results.

In this case the second upload only required 340k to go over the wire instead of the original 13.8M. That’s a pretty good saving. As we can see many of the 2000 byte blocks were broken down/replaced by different sized blocks. Eventually we’ll want to combine some of these smaller blocks into larger blocks but that’s for a future post.


Happy Uploading!

Optimising Azure Blob Updating Part 2

In my previous post I covered the high level theory for an efficient method of updating Azure Block Blobs. (This theory can be used against most cloud storage providers as long as their blob API’s allow partial uploads/downloads).

The implementation of what was described is now available on Github.

I’ll go through the implementation specifics in a later post, but for those who want to try out BlobSync, simply clone the github repo. Compile (I’m using Visual Studio 2013) and you’ll end up with a binary “BlobSyncCmd.exe”. Some examples of using the command are:


blobsynccmd upload c:\temp\myfile  mycontainer  myblob


This will upload the local “myfile” to Azure, in the appropriate container with the appropriate name.

Then, feel free to modify your local file and upload it again. If you use any network monitoring tools you should see a dramatic reduction in the uploaded bytes (assuming you don’t modify the entire file).

Equally you can run the command:


blobsynccmd download c:\temp\myfile mycontainer myblob


This will download the blob and reuse as much of “myfile” as it can. Currently for testing purposes it won’t replace myfile but will create myfile.new


More to come.

Optimising Azure Blob Updating (Part 1)

Cloud storage these days really allows any volume of data to be geo redundantly stored, always available and at a fraction of the price of 10 years ago. This is “a good thing”. One common problem I’ve seen is the amount of bandwidth wasted when updating existing blobs. Say you have a 10M file in cloud storage, you download and modify a small section of it, how do you update the version in cloud version?

1) Upload entire file again. Wasteful of bandwidth, time and money but sadly often the solution used since it’s the easiest option.

2) Keep some internal tracking system to determine what’s been changed and what hasn’t. Then use this information to only upload the modified part of the blob.

What follows is an enhanced version of #2 which can dramatically reduce bandwidth requirements when updating blobs in Azure Blob Storage.

For those who don’t know about Azure Block Blobs, the basic idea is that blobs (files in the cloud) are broken into a number of chunks/blocks. Each block can be uploaded/downloaded/replaced/deleted individually which in turn means manipulation of the blob can be done in chunks rather than all or nothing.(see this for more details).

Anyway, back to the problem. Imagine you have a blob, you then download the blob, modify it and now want to upload the new version.

blob1

For this scenario the problem is easy. We have a blob (top row) which is made of 4×100 byte blocks. Some of the contents of the second block (between bytes 100 and 200) are replaced. The size and more importantly the offset locations of all blocks stay consistent. Determining that some of the blocks are unmodified is easy, and we simply upload the new version of the second block. Unfortunately the real world isn’t always like this. What happens when we get this situation?

blob2

In this scenario, when the “uploading program” needs to determine what blocks can be reused and what parts need to be replaced. The contents of blocks A,C and D exist in the cloud blob (top row) as well as the new version of the file (bottom row). The problem is that although contents of blocks C and D existing in the new file, their locations in the file have moved. This is the challenge, detecting that blocks in the cloud can be reused even though their location in the new blob have moved.

Now that we know the problem (data blocks are available for reuse but are in unexpected offsets) we can start searching for a solution. The approach I’ve taken is to keep some unique signatures of each block already in the cloud and then look for the same signatures (hashes) in the new version of the file which is being uploaded.

The calculations required to find the new offsets are huuuuuge, well potentially huge, well “quite large” would cover it. For each block that exists in the Azure blob we need to search at every byte offset in the new file. To put it simply, if the file is 100M in size, and we’re searching for a block that is 10M in size, then the number of comparisons required is (approx) 100 million – 10 million = 90 million.

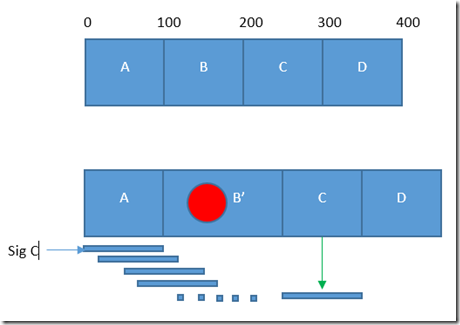
For example:
blob3

In the above diagram, we want to determine if block C (that already exists in the cloud) also exists in the updated version of the file.

The process taken is:

0) Set offset to 0.

1) Let SizeC represent the size (in bytes) of block C.

2) Let SigC represent the unique signature of block C.

3) Read SizeC bytes (starting at offset) of the new blob into byte array.

4) Generate the signature of byte array.

5) If the new signature matches SigC then we know that when we’re uploading the new file we’re able to reuse block C!

6) If the new signature does NOT match SigC, then increment offset by 1 and jump back to step 3.

As the diagram shows, eventually we’ll end up finding block C and therefore know we do not need to upload that part of the new file. What I hope is obvious is that a LOT of signature generation needs to happen as well as lots of comparisons.

The key for the entire process to become practical is the ability to do VERY quick signature generation so the 90M calculations don’t become an issue. Enter “rolling hash signatures” (see Wikipedia for more detailed explanation). Be warned, if you Google/Bing for rolling hash, you’ll probably get some rather different results to what you were expecting. 🙂

The way rolling hash signatures are generated is essential for this process to be quick enough to be practical. There are 2 ways of generating the signature:

Firstly, you can read N bytes from a file, perform some calculation on the array of bytes and end up with your signature. Easy peasy, but “slow”.

The other option (and this is the magic) is that if you have already generated a signature for bytes 0 to 3 (for example) you can simply generate the signature for bytes 1 to 4 (ie shifting the byte array by 1) by performing a simple calculation based off the old signature.

For example:

blob4

Now, it’s not literally Sig0 – previous byte + next byte, but it’s pretty close. We’re able to calculate signatures quickly and easily, this allows us to detect common byte arrays between the new file and the existing blob.

Although I haven’t yet covered the precise algorithm used for the signature generation we now have the basic building blocks for determining what parts of an update blob actually need to be uploaded.

Steps for updating modified block based blob:

(assumption is that when blob was originally uploaded, the block signatures were also calculated and uploaded. Trivially easy thing to do)

1) Download Blob from Azure.

2) Download Block signatures from Azure.

3) Modify downloaded blob/file to hearts delight.

4) Now we need to determine which blocks that already exist in the cloud can be reused (ie we don’t need to upload that data) and which parts have been modified.

5) Loop through every block signature downloaded

5.1) Perform the rolling signature check for entire new file.

5.2) If found, make note which Azure block can be reused.

5.3) If not found, make note of which bytes are “new” and need to be uploaded.

6) You now have 2 lists; one of new bytes to upload (offset in new file) and one that contains Azure blocks that can be reused.

7) Upload the “new bytes” as their own Azure blob blocks.

8) Instruct Azure Blob Storage which blocks (new and old) can be used to construct a blob which is bitwise identical to the modified local file.


All of the above is implemented and available on Github and eventually on Nuget. The next post will cover how to practically use these libraries and what the future plans are.

btw, for anyone taking notes, yes the entire blob post could have been summarised as “RSync + Azure Block Blobs”…  but thought I’d flesh it out a little 🙂